Hello friends! Today I’m blogging about a question that you guys have asked me over & over… how to make a product collage. Whether you are a student, employee, teacher, blogger, or just curious, knowing how to make a collage is a handy skill to have. Although it can be a complicated process, hopefully I can answer most of the basic questions you have.
First off, let’s talk about programs. I use Photoshop Elements to create all of my product collages. I took a class in college that taught me the basic uses of Photoshop Elements and since then I have learned a lot just through trial-and-error and by teaching myself. (The easiest way to learn is just by diving in!) You can also create collages in the full version of Photoshop, although I stick with Photoshop Elements because it’s a lot simpler and easier to use. Anyone can learn how to use these programs, however, they do take some effort and a bit of trial and error. If you get stuck on something, try looking it up on YouTube (I’ve had to do this so many times!). Anyways, I highly recommend Photoshop Elements for collages and photo editing in general… so let’s get started on how I make collages using the program.
Step One: Find the images you want to use in your collage
The first step is determining which images you want to include in your collage. I usually pick a theme for my blog posts, whether it is “spring products” or “save vs. splurge items,” etc. and then look at different online retailers to find products that fit into my theme. I create a specific folder on my computer for these images, and I title the folder after the name of the blog post I’m working on. Once I find an image online that I want to include in the post, I right click and save it to the dedicated file on my computer. When searching for images, make sure you are paying attention to the background – a white background will make the whole process 20,000 times easier – trust me.
If you don’t want to save the images to your computer, you can also take a screenshot of the product. On a Mac computer, press Command, Shift, and the 3 key at the same time to take a screenshot.
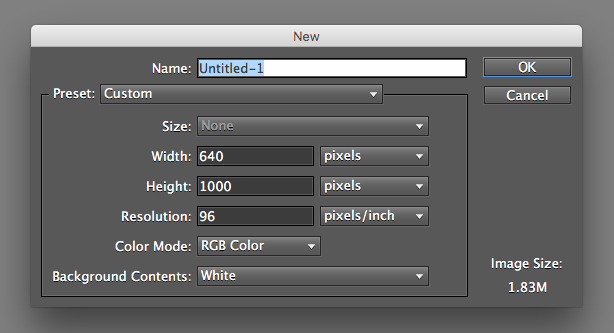
Step Two: Create a Blank File
Next, open up Photoshop Elements and choose File > New > Blank File. Everyone will have a different dimension depending on the width of your blog posts. For example, my blog posts are 640 pixels wide, so I set all of my collages to 640 pixels wide. You can make the length whatever you choose. Make sure the background contents is set to white.
Step Three: Import the Images
Click File > Open and choose the images that you rounded up for your collage. They will each open up in Photoshop Elements as a different document.
Step Four: Copy and Paste
Remember that blank file you created? Now you’re going to copy and paste each image onto that document. Using the rectangular marquee tool, outline the image that you want, copy it (Command + C), then paste it onto the blank file (Command + P).

Once the item is pasted onto the blank file, you can resize them using your mouse – just hover over the corner of the rectangle and it will turn into a resizing tool.

You’ll have to play around with the images to get the best arrangement of products. Try making them bigger and smaller, and moving them around until they all “fit” together.
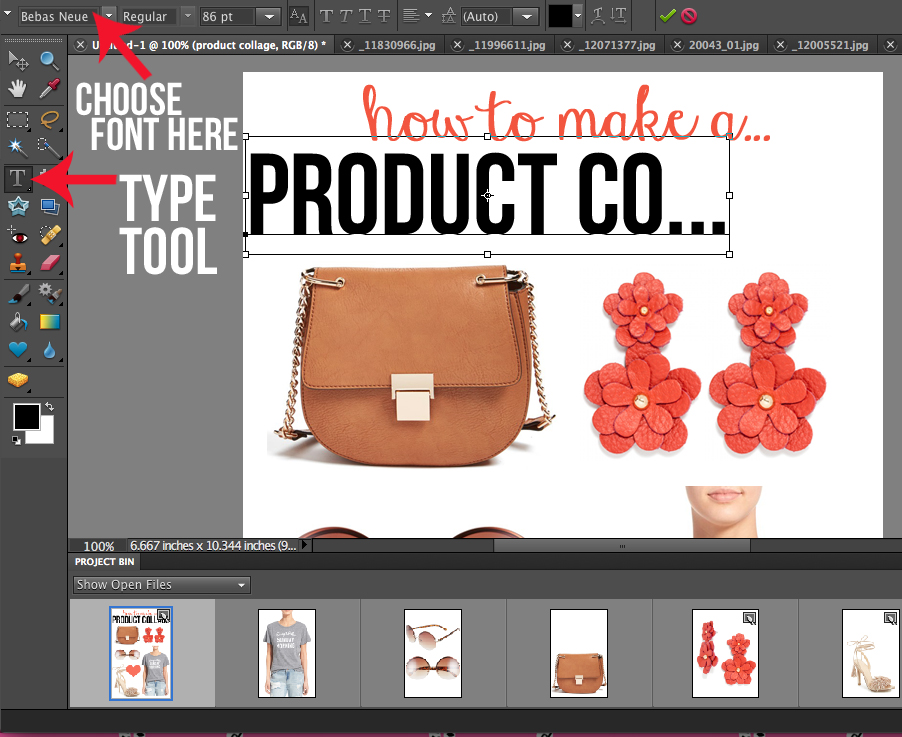
Step Five: Add Text
To add text to your collage, click the horizontal type tool on the left hand side. Above, you can change the font, size and color. I always play around with fonts to determine the best one to fit the collage. Once you’ve written the text, you can move it around on the page.
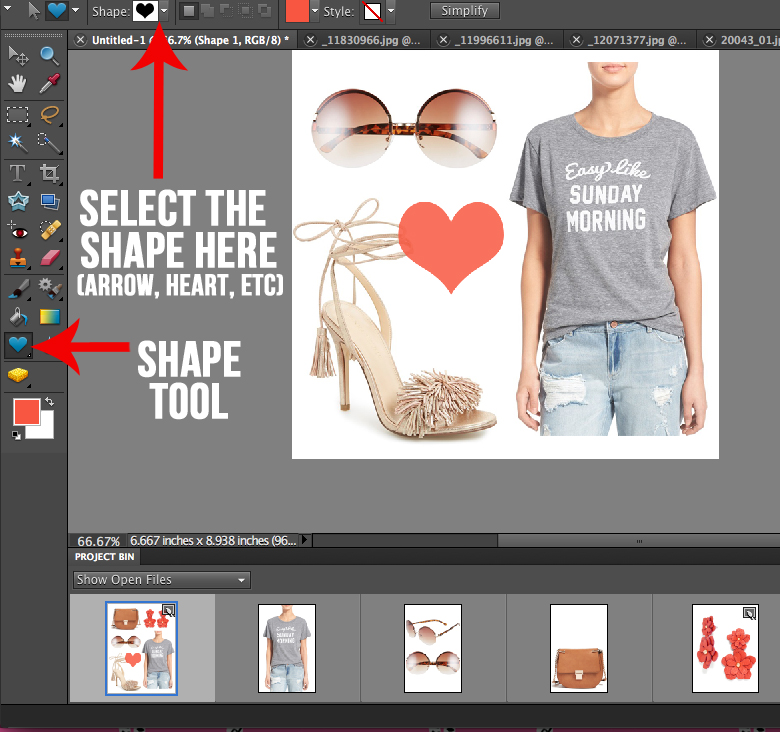
Step Six: Add Shapes
Adding shapes is pretty simple. Select the custom shape tool on the left. From there, you can select the exact shape you want (circle, arrow, heart, etc.) and draw them onto your collage. You can also select the color of the shape.
Step Seven: Save Your Collage
Once you’re happy with how the collage looks, it’s time to save it! Right now it’s still a psd (photoshop file), and you will need to change it to a jpeg in order to put it on a website. Click File > Save As. Under the Save As portion, name your collage. Under Format, make sure that it says JPEG. Then hit save!

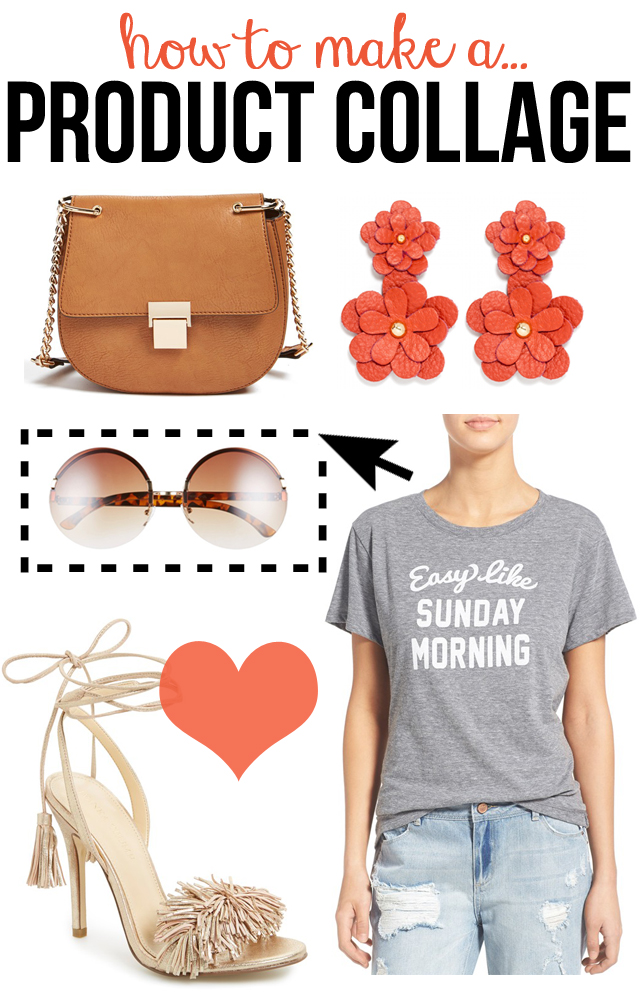
And voila! Your collage is done. This one happens to feature some items I’m loving right now… and most of them are less than $40!
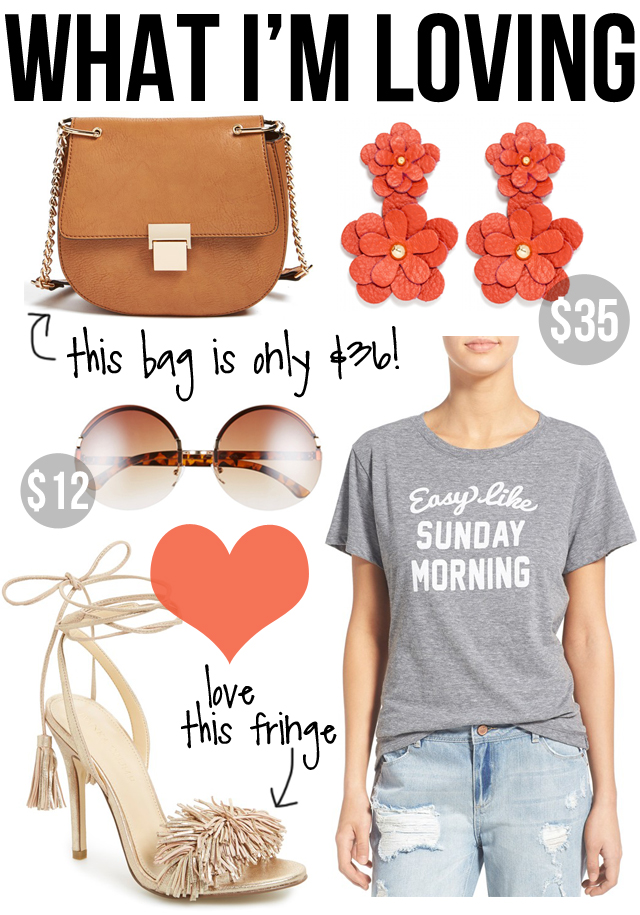
fringe heels // Sunday Morning tee ($34)
You can purchase Photoshop Elements here. I know that some of those steps can be kind of confusing… If you have any questions about Photoshop Elements or any of the steps, feel free to leave them in the comments!
Are there any other blog-related things you’d like to learn? If you have an idea, let me know!
SHOP THE POST:
A college course in Photoshop seems like it would be fun, and practical. Thanks for sharing your tips!!
Christina :: Simple and Delish
thanks a lot for this post! It's clear and I can understand it. I don't have Photoshop elements but Addobe Illustrator and I recognize the same lay-out .)
This is super helpful! Thanks for sharing this!
http://www.rdsobsessions.com
So far I didn't create a collage – but now I really want to do this 🙂 Thanks for the tips!
xx from Bavaria/Germany, Rena
http://www.dressedwithsoul.com
I love that tee shirt!! And those shoes are so cute!!
pinkandnavystripes.com
Great post, thanks for showing us.
|| D I A N A ||
http://www.TheNeonFactor.com
Awesome! Thank you for sharing<3
Shall We Sasa
Great tips! Thanks for sharing!
Her Heartland Soul
herheartlandsoul.com
Great tips! Much better than my current Power Point slide conversion to JPG collages!
http://www.startingsouthern.blogspot.edu
Thank you so much for this post!!!
XOXO,
Holly @ http://www.palmettocouture.com
Oh my gosh, I spent two hours last week putting a collage together so thank you so much for sharing this!!! I'll have to try that program next time. 🙂
I love reading blogging tips and tricks! Product collages are so fun to make–I've never used Photoshop Elements before! I will def be giving it a try!
http://www.rosyoutlookblog.com
This is a great tutorial! Thanks for sharing!
Thank you SO much for putting this post together! You have solidified my decision to invest in Photoshop and get my blog to the next level. Thank you!
Xo, MacKenzie
simpleclassychic.blogspot.com
Thanks for sharing! I use polyvore now but definitely am thinking of purchasing elements 🙂
Sara | Lipstick, Lattes & Lunges
So helpful! I use PE as well and didn't know about the "Shapes" tool, definitely going to have to check that out!
If you have any trick for how you trim items that do NOT have a white background, I would love to hear that. I seriously wish that every site just shot on a white background because it's so hard to trim grrrrr. (Or I don't know the best way haha)!
xo Mary-Katherine | Gold-Hatted Lover
This is a really helpful post! Thank you Caitlin!!
-Monica
http://www.newenglandclassicbeauty.com
Awesome!! Thank you for doing this post. I have been wondering how to make these.
Thanks for sharing this.
http://www.amysfashionblog.com/blog-home/
This is so helpful!!
Happy Wednesday // http://lifeplusbe.com/
Your collages always look amazing so thank you! I used to use paint to create them which worked OK, but didn't give me very much freedom. Thanks for the great tips!
Kim
http://trendkeeper.me .. Working from home OOTD!
This is SO helpful! Thank you thank you thank you!!
Love this post! I use photoshop to do all of mine and it took a lot of trial and error! I'd love a post on how you edit your blog photos or anything on photography because your photos are always amazing! <3
xo, Nina
Law of Fashion Blog
Hello 🙂 Do you use Photoshop elements to edit your blog pictures? I'm not sure which photoshop to go for but your pictures are amazing and it would help to know that way it can lead me to the perfect photoshop product. Thank you!
Hey Stephanie,
Yes I use Photoshop Elements to edit my blog pictures as well! I usually increase the saturation, brightness and sharpen the photos (other than that, I don't do too much to them). It is great for picture editing!
Great post! Thanks for the tips!!
xoxo
VGB
http://www.verbalgoldblog.com
This is so helpful! Do you suggest investing in just Photoshop Elements or the full Photoshop?
xox,
Ashley
http://www.lifeandreactions.com
I think the full Photoshop would be great – I'm just not trained in how to use it. If you can get someone to train you on Photoshop or are comfortable training yourself with YouTube videos, I think it would be better. Photoshop Elements is simpler but it still gets the job done well!
Great post, I love photoshop! Abode InDesign is also GREAT to diagram any type of collage or graphic. I use it for almost everything on my blog.
Andrea | Twentyish Brunette
This is so helpful thanks for sharing.
http://dressmecasual.blogspot.com.eg/
Great tips! Thanks for sharing. And love all of the items you picked too.
How Gorgeous
THANK YOU SO MUCH (and I'm shouting, lol ) this has helped a great deal. I took a photojournalism class and I am a bit familiar with Photoshop but this was a great refresher and great tips. Thanks again (:
Well…in addition to having wonderful style, it seems you are a mind reader as well! I have spent the last week trying to figure this out and was wondering if it was Polyvore but after joining realized that although it's wonderful, it wasn't what I was looking for. Thank you, thank you, thank you!
Awesome tutorial! I use a similar program to make my collages, but these tips were awesome! Thanks so much for taking the time to share how you make your collages! I love that you take the time to do posts like this. 🙂
Rachel
Simply Rachel Nicole
Thanks so much for this. I was one of those who requested this post. I'm teaching myself how to use Photoshop but I didn't even know about Photoshoot Elements. Thanks
Michelle
Thank you so much for this post! I have been meaning to write to you and ask you how to do this! Thanks for sharing gxx
This is such a fun and helpful tutorial! I use regular photoshop, but would love to learn photoshop elements! Awesome!! Xo
@stylemelauren
http://www.stylemelauren.com
wooow thank you so much for sharing these tips with us..I honestly used pickmonkey for collages but since now I hope to learn this tutorial 🙂
Be Happy with Fashion
thank you so much, that was beyond helpful ♥
Great post! I always love seeing the behind the scenes stuff!
http://www.lucylovestosparkle.com
Oh my gosh, I love this post! So helpful!
xoxo,
Katie
chicincarolina.blogspot.com
Such a smart tutorial! Great blog post girlie.
XO, Jessi
mywhiteT.com
Thank you! I've tried to do this, but think getting the Photoshop Elements program would help a lot!
Sally
http://Www.thefashion-able.com
I use a combination of Photoshop and Illustrator to make my collages! Loved this post!
xo, Jill
http://www.setforthinstyle.com
I'm loving that tshirt — and thanks for the tutorial! I'm still learning photoshop and love any help I can get 🙂
x Sarah
http://www.bohochiccafe.com
Really helpful and interesting post! As a new blogger, I thoroughly enjoy these types of "behind the scenes" posts – it really helps people to see how much work goes into creating a post. Maybe another blogging post can be on creating a subscription list – like are they really necessary!?
Lisa
everydayelevated.blogspot.com
This is super helpful! I've always wanted to learn how. Thank you for sharing this info!
XO
StyleByPear
Thank you, thank you, thank you!!!
Do you have to worry about copy right laws when you take a screenshot or save the photo online? How do you know if you are allowed to use the photo/ can post it on your blog?
Thank you so much!
Glamorous and Gifted
Glamorousandgifted.blogspot.com
I have that same exact question!! Thank you for asking.
I think it is okay to use retailer's images IF you link back to them – that's why I include a link to every single item in my collages. Think of it this way – you are driving traffic and sales to their websites, so they are getting business from you!
Thank you! I totally agree, but thought maybe I was missing something. That has been a blogging mystery to me. I appreciate your straight forward post and answer. I love reading your blog every day on my lunch. Even though we aren't the same size, I LOVE your fashion sense and writing technique. Keep it coming!
Thank you, I have a client that is looking for new ideas for selling her products. Thanks again!
Thank you so much! I'm working with a client who has been looking for new ways to sell her products,this looks like a great way to showcase her products. Thanks again.
Love this 🙂 So creative and helpful! Great tips.
Lucy xoxo
http://lucyannblog.blogspot.co.uk
Definitely bookmarking this! Thanks so much for sharing!
Lauren,
http://www.atouchofsoutherngrace.com
Thank you SO MUCH for posting this!!!!!!!!!! I have asked people seriously a million times and no one has ever answered me. I make mine right now just using powerpoint but its a wicked pain and they don't look as good. Posts like this are the reason you are one of my favorite bloggers!!
Xo, Tara
http://brunette-ambitions.com
Thanks for sharing this post. I have been finding someone to share about this!!
XO Hazel
http://hazeldiary.com
Awesome tips! Definitely pinning this <3
Green Fashionista
Thank you so much for posting this, it is so helpful!! I've always wondered how you made your collages so I'm really excited to try for myself 🙂 I'd really love if you also did a post on how you edit your photos! You always have the best quality photos so I'd love to learn how you do it. Thank you so much!!
xoxo
Alexis
http://www.alwaysinpearls.com
I was wondering if you use any apps to track your Instagram stats? For example when are you most popular time to post etc. I would also love to see how you edit your blog photos! I use photoshop cs6.
Thanks 🙂
Chanelle
http://www.southernlyaccessorized.com
Such a great post, thank you for sharing!
Blonde in Cashmere
Nice post. I am happy to visit your blog. Thank you so much for sharing.
remove background from image services
I love this post I have yet to purchase this , but I was wondering, do you have to pay $10 monthly for it after you've purchased the software?
thanks so much for this tutorial. I am a new blogger and looking into getting elements to create product collages for my blog too.
griseldahasselbring.com
This is just what I was looking for!! Thank you so much!
http://www.LaurenBessette.com
Looking awesome!
Nice job.
Also try to make collage with RonyaSoft collage maker
CAIT!!!!! THANK YOU so much for this post! I've been trying to figure out my Photoshop program for.ever. I think this is really going to help. XOXO
Hi Cait, great tutorial! How did you add the handwriting and arrows to your collage? Thanks!
Hi Cait, great tutorial! How did you add the handwriting and arrows to your collage? Thanks!
Hey Devon, all you have to do is click the "text" tool and it will let you type anywhere on the collage! For the arrows, I draw them myself using the "pencil" tool!
This is supper helpful!
Thanks so so much !
http://www.amazingadventuresofemmalynn.com
Thanks so much for sharing! I will definitely check this out!!
Simple Savvy Style
https://simplesavvystyle.wordpress.com
Hi! Thanks for the tips! Also wondering if you can tell us how you link the items under the post? Is that something the average person can do? 🙂